A garage door is generally a heavy object weighing up to 750 pounds or more. But you typically do not feel any of that weight as you lift it effortlessly with one hand, thanks to the torsion spring.
The spring does the heavy lifting, literally. But it can often break down, and you must fix or replace it to restore normal function. In any case, you may hire a professional to do the job. But if you choose to do it yourself, you must know how many turns on a garage door spring will balance your door.
Also Read:
- Best Garage door Openers
- Best Garage door Keypad
- What size garage door opener do I need for a 16 foot door
- My Garage door opener goes up but not down
How Many Turns on a Garage Door Spring?
When installing a new garage door spring or balancing one, the rule of thumb is to put a full turn on your torsion springs for every foot of garage door height, then add a ¾ turn at the end. So, if you have a standard 7-foot garage door, it will require a total of 7 revolutions plus a ¾ turn at the end (7¾ full turns).
This rule applies across the board, so the number of turns will vary depending on your garage door height. If you have an 8-foot door, it will require 8¾ full turns. A 10-foot door will be 10¾ turns, and so on.
Here is a list of the 4 best garage door Springs you can find at Amazon.com
- DURA-LIFT Heavy-Duty Extension Garage Door Spring 2-Pack
- ZhenT Garage Door Torsion Springs 2” (Pair) with Non-Slip Winding Bars
- Garage Door Torsion Springs 1.75’’(Pair) with Non-Slip Winding Bars
- Impactspring Professional Garage Door Torsion Spring Repair Set
The rule of quarter turns in garage door springs.
Now, you will find it easier using quarter turns, so you do not have to wait for the spring going around to make one count. Using quarter turns pretty much simplifies your work. You just need to insert your torsion spring winding bar, raise it up, put your other bar in—and that makes a one-quarter turn.
To complete tightening the spring, keep in mind the total number of quarter turns you’ll need. Then make the count until you reach that number.
Here is a table showing the number of quarter turns you will need for various door heights. You can always use this as your chart if you opt to service your garage door torsion spring on your own.
| Garage Door Height | Full Turns | Quarter Turns |
| 6’6’’ (6 feet, 6 inches tall) | 7 | 28 |
| 7’ (7 feet tall) | 7 ¾ | 31 |
| 7’6’’(7 feet, 6 inches tall) | 8 | 32 |
| 8’(8 feet tall) | 8 ¾ | 35 |
Ideally, the number of turns to put on your garage door torsion springs is all based on the door height and the diameter of your torsion cable drums. However, the drums are typically similar in diameter as an industry standard, so the door height remains the main determining factor.
Once you are done installing your torsion springs, test them out to see if they are balanced. For example, if the door is a little too heavy on the bottom or snappy at the top, the behavior could tell you it is not properly balanced.
Testing if the door is properly balanced
To know if you have balanced your garage door correctly, close the door and disconnect your electronic garage door opener if you have one installed. To disconnect it, grab the handle of the emergency release cord and pull it down and back. This will release the opener mechanism from the door.
Starting with the garage door in the down (closed) position is essential in ensuring you can lift it up to different heights and examine it for balance.
Then, open the door to the halfway position by lifting it with your hand. Alternatively, you can leave it open at different positions and observe what happens. If there are any up or down movements, you need to remove or add tension from the springs.
A balanced garage door should remain afloat in the same position you leave it when open, whether this is somewhere near the ground, in the half-open position, or slightly toward the fully open position.
If you leave it in the midpoint position, it will remain there with little movement to indicate proper balance.
You want to ensure your feet are not directly under the door when you let it go. It could come crashing on your feet if it is not balanced.
If the door slides to the fully open position or falls to the ground shut when you let it go, it can be dangerous and requires adjusting to balance it.
How to balance the garage door
If your garage door is unbalanced, it could ruin your opener in no time. Normally, the springs on your garage door do all the heavy lifting. The opener is simply responsible for a fraction of the work.
If the door is not balanced, it could exert unhealthy amounts of tension to the motor on your opener, leading to premature damage. Remember that the motors typically have plastic parts that can wear out pretty fast if subjected to unhealthy amounts of strain.
So, to avoid that risk, you need to ensure the garage door is properly balanced, and the springs do their job.
Your garage door has two types of springs, side-mounted springs, and torsion springs. Side-mounted springs are generally safer and easier to adjust. They also do not require specialized tools to adjust.
To adjust the side-mounted springs, you would need first to locate them on both sides of the ceiling track.
If the garage door is closing on its own, you would need to move both springs up by one hole to add tension. You begin by unhooking one spring from its current hole in the bracket holding it in place, then moving it to the hole above it. After you are done with one spring, you do the same to the other.
If the garage door opens on its own, move both springs down by one hole to reduce the tension. Here too, you work on the spring on one side, then the other.
Note:
- You must disconnect the automatic garage door opener and have the door at a fully open position when adjusting side-mounted springs so that there is no tension on them.
- While at it, always consider making adjustments one hole at a time and testing the door for balance.
Adjusting the torsion spring—step by step
In contrast to side-mounted springs, torsion springs can be risky to adjust if you are not a professional. They require proper tools and expertise that you might lack. However, if you prefer to do the job on your own, here is the procedure to follow.
What you will need
- At least two torsion spring winding bars
- Work gloves
- Safety goggles
- Flathead screwdriver
- C-clamp (at least two)
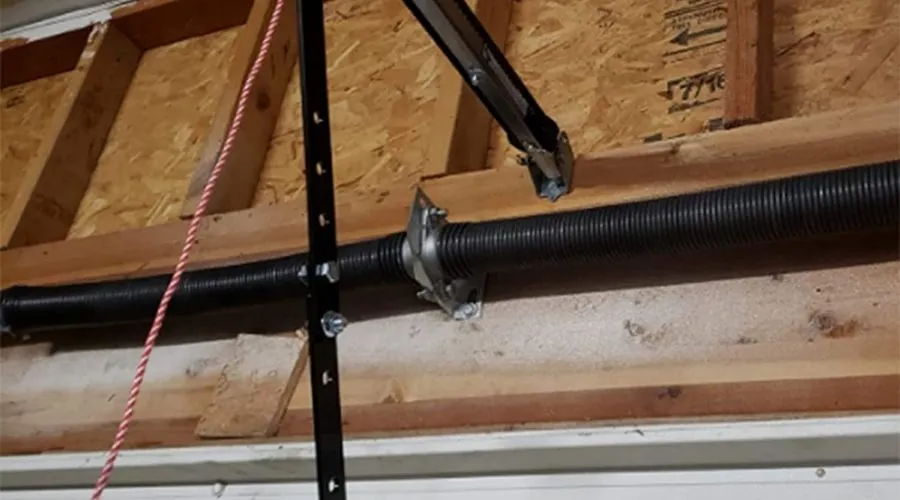
Step 1: Locate the torsion spring
The first thing when installing the springs is typically to ensure you have the correct springs on. The chances are that the right springs are already installed, so your work is simply to locate them on the bar above your garage door.
Ensure the garage door is fully closed before you start making any adjustments to the torsion springs. The door must be closed when adjusting torsion springs to ensure tension on the springs.
Step 2: Clamp the door in place using a C-clamp
Start by wearing safety eyeglasses and work gloves to protect yourself from unanticipated accidents.
Place a C-clamp on each garage door track right above the top-most roller to prevent it from rocketing up while you work and potentially causing injury. Open the C-clamp and slide it onto the roller track, then tighten it as much as possible.
Do the same with another C-clamp on the track on the other side of the door.
Step 3: Insert a torsion spring winding bar into the adjustment collar of one spring.
Once you have chosen the side, to begin with, insert the tip of a winding bar into its adjustment collar (the metal fitting with a screw and holes at the end of the spring).
To carry out this exercise, you should have at least two torsion spring winding bars (the metal rods for adjusting the garage door torsion springs). You can always buy torsion spring winding bars on Amazon if you do not have a pair of solid metal rods that can fit the adjustment collar.
Step 4: Untighten the set screw in the spring’s adjustment collar.
There should be a flathead set screw in your garage door’s adjustment collar. Loosen this with a flathead screwdriver by rotating it counterclockwise until there is no more resistance. You want to ensure it is not resting against the garage door spring bar before you begin putting any turns on the spring.
Ensure the winding bar you inserted into one of the holes is securely in place to hold the spring before loosening the set screw. Be sure to insert the bar all the way in to secure the spring. Also, ensure you hold it in place while loosening the set screw.
Step 5: Put or remove quarter turns on your spring to tighten or loosen it
If the door is opening on its own, remove a ¼ of a turn on the spring to loosen the tension. To do this, turn the torsion spring winding bar down by a quarter turn at a time to slightly decrease the tension on the spring.
If the door is closing on its own, add a ¼ of a turn on the spring to tighten the spring. To do this, use the winding bar to rotate the adjusting collar about ¼ of a turn upward.
Always add or remove only one or two ¼-turns at a time for safety reasons. Taking too many turns at a time can cause the door to do something unpredictable.
Step 6: Fasten the set screw in the adjustment collar.
Before removing the torsion spring winding bar, you need to return the set screw back in to hold the adjusted spring in place. So, keep the winding bar in place with your hand holding it firmly, then turn the set screw several times clockwise with a flathead screwdriver to tighten it.
Once the screw is tightened all the way in, you can gently remove the torsion spring winding bar.
Step 7: Repeat the entire procedure on the other spring.
You must adjust the other spring exactly the same way to finish balancing the door. If you added or removed two quarter turns, add or remove the same number of quarter turns on the remaining spring as well.
Step 8: Test the door to see if it is balanced.
The final step is to test and see if the imbalance is fixed. If the door still closes or opens on its own to indicate an imbalance, go follow the same procedure to make further adjustments—one ¼-turn at a time on each torsion spring.
How to Replace Garage Door Springs
Garage door springs play an instrumental role in closing and opening the door. As a result, the springs must always remain in top condition to eliminate inconveniences you and your family may experience while accessing your garage.
However, like other supportive systems, the torsion springs may break over time due to continuous usage, lack of maintenance, or age, failing to operate the door mechanism. You wouldn’t want to run a garage door with a dysfunctional spring as the door’s weight might fall on you or a family member and cause massive injury.
Getting a broken spring fixed may require the services of a professional. However, you can also do it yourself and save some bucks and time, otherwise spent looking for an expert.
If you have decided to do the replacements yourself, check whether the springs you have acquired for replacements are of the exact specifications and size as the one getting replaced. Recall that the springs support the whole garage door weight, and you should consult a professional when you feel uncomfortable.
Nevertheless, here is a guide on how to replace garage door springs.
Tools Needed
- Drill
- Socket wrench
- 2x winding rods
- DURA-LIFT torsion springs
Step 1: Disconnect the Opener
The first step to replacing the garage door springs is disengaging the opener. You do not want the garage door to start opening by itself during the installation, as this could expose you or the professional to the risk of injuries.
Step 2: Loosen Old Springs by Unwinding the set screws
Locate the set screws by unwinding the torsion spring using the winding rods. Once identified, use a socket wrench to loosen the screws until they no longer grip the torsion spring.
While unwinding the torsion spring, observe the quarter turn by quarter turn rule. You should repeat this process uniformly until the spring loses all the tension or when the spring is totally unwound.
Step 3: Locate and unbolt the stationary cones from the bracket
After unwinding the springs, the next step is to unbolt the stationary cone of every spring from the center bracket. Use a drill for this job.
Step 4: Loosen the cable drum from the rod and remove the old springs
Locate the cable drums and loosen every set of screws using a wrench. At the top door, disengage the cable from the drum and the bottom of the door.
Slide the drum off the torsion bar and set it to the side to assess the springs. Slide the torsion bars slightly from the bearing plate to remove the old springs. Do this on either side of the door to remove the springs from the torsion bar.
Step 5: Insert new Springs into the Torsion Bar
Inserting the springs back into the torsion bar should follow the same process as the removal. Slide each new torsion spring onto the bar, ensuring the stationary cone is towards the center. Once the springs are correctly fit onto the bar, slide the drums back onto the torsion bar. Put the bar back into the end-bearing plate. Tighten the screws on every drum using a wrench to hold the springs firmly to the position.
Once the springs are positioned, bolt the torsion spring to the center plate using a drill. This will ensure the springs are well protected and firm to carry the door’s weight.
Step 6: Tighten the Springs to the Torsion Bar
Firmly tighten the springs to the torsion bar. Use the winding rods to tauten the springs to the bar. When tightening the springs, wound them four-quarter turns per foot of the door height and add two extra turns.
The total turns on the windings in the case will be determined by the length of your garage door. For instance, if you have an 8 feet tall garage door, you will wound the torsion spring to 34 quarter turns (8*4 + 2 extra turns=32+2). You must consider this essential aspect when winding the torsion springs.
Step 7: Test Tension
You shall have done an incomplete job that can expose you and the family members to danger if you do not test the tension. You must ensure that the springs are wound the right number of times. The correct windings or number of turns will guarantee that your garage door can close and open properly and systematically.
You can test the garage door spring’s tension by first lifting the door to the halfway position. If the door balances in this position, you have wound the springs correctly. This will also mean you have successfully replaced the torsion springs.
Nevertheless, the garage door will move down from the halfway position if you have not wound the springs the correct number of times, say 33 times and below for an 8 feet garage door. On the other hand, if the door moves up from the halfway position by itself, it means the torsion springs have been wound more times. Say, 35 times and more for an 8 feet garage door.
Reengage or reconnect the operator if you have confirmed the door balances in the halfway position when lifted. Test the door to ensure it closes and opens with ease and appropriately. This will guarantee that you have executed the whole process well and that your springs are effectively replaced.
When should you increase the tension on a garage door?
Adjust the garage door spring by increasing the tension if the door closes by itself, is heavy at the bottom, or is difficult to open. On the other hand, decrease the tension on the garage door spring if the door opens too quickly, does not close fully, or is difficult to close.
The garage door can also close unevenly if one side of the garage door is unbalanced. In such a case, balance the door by adjusting the tension on the side with the gap.
How do you replace a spring on a garage door?
To replace a torsion spring on a garage door, remove the old torsion spring and slide the new one onto the torsion tube with the stationary cone facing the center bracket. Next, reinstall the cable drum with its corresponding garage door wire.
The next part is to insert the torsion bar back into the bearing bracket. Finally, shove the torsion bar back to the left, then slide it on the center bearing.
How do you measure the spring tension of a garage door?
To measure the tension on the side-mounted springs on a garage door, measure the height of the garage door and the circumference of the cable drum in inches. Then, divide the height of the garage door by the circumference of the cable drum and add one to the figure you get.
This number corresponds to the number of revolutions in the spring.
The video below illustrates how many turns to put on your garage door spring
Conclusion
Installing or servicing a garage door’s torsion spring is a potentially dangerous task. But if you choose to carry it out, it is essential that you know how many turns on a garage door spring will create a balanced garage door.
We hope this tutorial was helpful. Please leave a comment in the comments section if you have any thoughts or observations.