 Skip to content
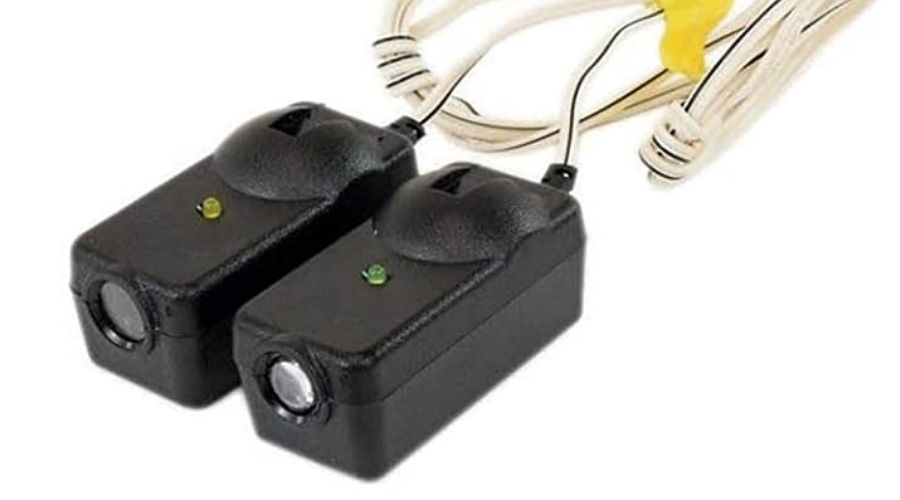
Every homeowner enjoys the convenience of garage doors equipped with an automatic reverse feature. Your garage door has two sensors on both sides of its entrance whose primary function is to stop and reverse it to a fully open position when the beam between the transmitter and receiver gets obstructed.
The automatic reverse feature is designed to prevent injuries to you, your family or your pets and damage to properties by stopping the door’s movements when something is on its path. Nevertheless, when your garage door starts malfunctioning, it interferes with the garage’s daily use.
We often overlook the importance of a garage door lighting system, especially the sensors, not knowing how they play an influential role in determining the efficient operation of the garage door. Sometimes, you may fret when you realize your garage door sensors are not lighting up and would want to call a professional to offer help. Luckily, I have a solution for you.
Tag along to stand guided on the question; Why are my Garage Door Sensors not Lighting Up?
Also Read:
Why are My Garage Door Sensors not Lighting Up?
Your garage door sensor may fail to light up due to faulty sensors, shortening wires, or not connecting the sensors to the power supply. When both sensors are not lighting up, it may be due to faults such as broken wires or the safety-reversing sensors not connecting to a power source.
The green light on the garage door sensor indicates there is no problem with the power supply, and when it does not light up, it means there is a connection problem to the power source. The no lights on garage door sensors problem, that is, if both lights on the sensor are off, shows that the sensors have no power and can’t respond.
Besides, the sensor lenses can get dirty over time and stop sending necessary signals when closing the door causing both garage door sensors not lighting up. You can unblock the signal by carefully cleaning the lenses.
What is the Role of Garage Door Sensors?
The garage door sensors, also called photo eyes, enhance safety and security by ensuring that the garage door does not crash an object, small children, or a pet in its path when closing. The two sensors on either side of your garage door, the sender and the receiver communicate by sending signals and must see each other. The garage door will immediately stop when there is an obstruction in its path or reverse its direction.
For your garage door to continue closing, there must be no obstruction of the infrared beam between the receiver and the transmitter sensors. Any interruption of the Infrared rays transmitted between the two sensors will force the door to stop and reverse its direction, protecting the object, whether your pets or a small child on the garage door’s path.
How Do Garage Door Sensors Work
The garage door sensors work by using a photo-eye system. The system has an infrared sensor placed on either side of your garage entrance, approximately 2-6 inches above the ground. One sensor transmits the beam while the other reads the beam. When the garage remote is pressed, a signal is sent to the sensor to open the door. The primary function of the photo eye is to prevent the door from closing on someone or an object on its path.
The photo-eye sends an infrared beam when the door is open. The door only closes if the beam is uninterrupted. If an object or person is on its way, the door won’t close but reopen (reverses its direction).
How to Test your Garage Door Sensor
You can easily test the functionality of your garage door sensor, especially when your garage door is not working, to determine whether the sensors are at fault or after changing the sensors or wires connecting the sensors.
To test the functionality of your garage door sensor, place any object on your garage door’s path, such as cardboard, and try closing the door. If your garage door stops and reverses the direction when an object is on its path, it functions appropriately. However, if your garage door closes on and crashes your object, the sensors are at fault, and you may need to troubleshoot them.
Garage door sensors not working
A malfunctioning garage door sensor can expose you, members of your family, and even your pets to injury as their safety and security functions are hindered. Your garage door opener sensors play an inevitable role in stopping the garage door from closing on any object on its path by reversing its direction.
However, your garage door sensor can fail at a crucial moment and can cause massive damage to you that can cause injury or death or even damage your property. It is fundamental to determine some of the possible causes of a garage door sensor that is not working and ways to troubleshoot them.
Here are some of the causes of a garage door sensor not working and how to go about them or solve
Dirt Lenses
The most probable reason for a garage door that won’t close is dirty lenses. Your garage door sensor lenses may attract dust or dirt when left exposed, inhibiting the transmission of the signals between the two sensors.
Your garage’s door sensor photo eyes are always small and will attract dust over time. You need to ensure that the lenses are always free of dust. However, check on the lenses for dust if your garage door is not working. Use a soft cloth and gently wipe out the dust without leaving streaks on the lens surface.
You can use the soft cloth with a mild cleaner but ensure not to leave the lens surface wet as this will attract more dust or dirt, further inhibiting your garage door’s functionality.
Misalignment of sensors
When your sensors are out of alignment, the signals sent from the transmitter sensor may not reach the receiver sensor, preventing your garage door from fully closing. Your garage door sensors need to be pointed in the same direction and angle.
To determine if your sensors are aligned correctly, check the LED light on the exterior of each sensor. If all the LEDs are blinking, the sensors are correctly aligned. However, if only one of the sensors is flashing, the sensors are out of alignment or misaligned.
To troubleshoot misaligned sensors, use a screwdriver to tighten the screws on the bracket holding up the blinking LEDs and try to adjust it until it is in alignment with the other on the opposite side of the door. You can also perform the alignment by bending the bracket back to its original position. Once they are correctly aligned, the blinking will stop.
Damaged Wires
A malfunctioning garage door sensor can also result from damaged wires that connect the door sensor system. Over time, these wires can go through wear and tear due to regular use, pest invasion, or changes in the weather conditions.
To correct the problem, check the connecting wires if they are damaged by water or feature chew marks. If that is the case, or if any other tampering, replace the cables.
The video below illustrates some of the garage door sensor problems and troubleshooting tips
How to troubleshoot the safety reversing sensors when both LEDs are not lighting up
The garage door opener can only move downwards when the safety reversing sensors are connected and aligned correctly. The sensors should be aligned appropriately, and in case they are not, there are a few steps you can employ to fix the issue. The sensors will not be lit up when:
- The safety reversing sensors are not connected to a source of power or installed
- The safety reversing sensors wires are either short or broken.
- The sensor is faulty
What to do when the safety reversing sensors are obstructed or misaligned
- First, find out where the safety reversing sensors on both sides of your garage door are.
- Ensure no object or item is blocking the sensors. Immediately you remove any obstruction, the LED on both sensors glow steadily.
- You can then use a remote control to try closing the garage door. If it closes, then the problem is solved.
When you determine that the garage door still won’t close even if nothing is blocking the sensors, you can consider these other options like aligning the sensors, checking the wiring connections, and checking the safety reversing sensors.
Aligning the sensors
When you do not see a steady glow, then your sensors are out of line. Find out if the sensors are set at least 6 inches above the ground.
- Start by loosening the wing nut on the green LED, which is the receiving sensors
- Adjust the sensors until the green LED light steadily glows and then fasten the wing nut
- If the green LED is still blinking, adjust the sensor until the sending sensor is steadily glowing (Amber LED).
- Use the remote control to close the door
- If the garage door closes, then test the safety reversal after this adjustment. If it works perfectly then, the problem is solved.
- If the door doesn’t close, then check the wiring connections of the garage system.
The procedure of checking the installation and wiring connection
Depending on the garage door mode l, a sensor that flashes orange instead of the normal red light may indicate an issue with the wiring connection. Examine carefully all the wires leading from the sensor to the terminal on the opener’s back. Check if the wires are broken, twisted, or tangled. All the wires must be properly connected for the garage door to work.
- Install the safety reversing sensors if you have not done so, and this will automatically solve the issue. When the safety sensors have been installed, move on to the wiring.
- Inspect the wiring from the safety reversing sensors to the opener.
- Ensure the white wires from the safety sensors are connected to the white wire terminals on the garage door opener. Then the wire colors may be different if your garage is pre-wired.
- Ensure the black wires are connected to the black terminals on the opener.
- Tug the wires gently to ensure they are secured and connected correctly.
- Use the remote to close the garage door. If the door closes, then the opener is working correctly.
The procedure of troubleshooting the safety reversing sensors
- Remove the sensors from the brackets using a screwdriver
- Disconnect the wires from the wire nuts
- Strip both terminals of the wires from each sensor using a wire cutter or a sharp object. Connect the wires and twist.
- Detach the white and grey wire ends on the operator’s back.
- Attach the white wires of the sensor to the white terminals and the black wires into the grey wire end.
- Position the sensors to face each other, and if both the LED sensors power-up, there is a problem with your wiring. You can replace the wires connecting your garage opener to the sensors.
- If the LED sensors do not power up, then replace the sensors.
How to check for an open or shorted wire
The receiving sensor (green LED) steadily glows when it has power. If the LED is not glowing steady, then there is an open or shorted wire. The situation can be sorted by;
- First, replacing the wires currently connected to the sending sensor.
- If you have replaced the wiring and the receiving sensor is still not glowing steady, replace the safety reversing sensors.
- Try closing the garage door using the remote control. If the door closes, test the safety reversal after this adjustment but if the door doesn’t close, try switching the positions of the sensors in your garage.
If the garage door is perfectly aligned, the wiring is OK, and then maybe the sensors are worn. The wearing out can be attributed to basic wear and tear or even constant exposure to direct sunlight. Removing an old sensor and replacing it with a new one involves a few simple steps.
Steps involved in replacing new garage door sensors
- Unplug your existing garage door opener
- Mark the place where the existing sensors are located, loosen the wing nuts on both sensors with a wrench
- Disconnect the sensors.
- Fix the new sensors and ensure they are precisely at the same height as the previous ones.
- Fasten the wingnuts and plug the garage door opener.
- Perform a garage door opener test.
Frequently asked questions
Why is the green light not on my garage door sensor?
The absence of green light in your garage door indicates an open or shorted wire. The green LED, or the receiving sensor, will glow steadily when it has power. Also, the production of the green light indicates the sensor is functional. If this is not the case, replace the cables connected to the transmitter sensor.
How do I reset my sensor light?
The prudent way to reset your sensor light is by turning it off and then back for 30 seconds or longer. You can also turn the power connected to the sensor off at the breaker to ensure it has enough time to reset itself. If that still doesn’t work, then maybe the sensor or the outlet is faulty.
Should both Garage Door Sensors be Lit
Yes. If nothing is blocking the sensors, the LEDs in both the sensors should be lit and glow steadily. The problem of garage door sensor light off results when the garage door is not working, especially when there is a problem with the wiring system.
Should garage sensors be green?
Yes. The garage sensors should show a green light when functional or working. However, if the green light changes to a red light, it implies a problem with the garage door. Often, the red flashes happen when the sensors are out of alignment.
You can reposition the sensors by inspecting the brackets and tightening the screw on the sensor with red flashes until the blinking stops. Also, you will know the problem is fixed correctly when you close your garage door, and it closes without stopping or reversing its direction.
Why does my sensor light keep going on and off?
The sensor light going on and off can be attributed to the light itself, the circuit, the sensor’s sensitivity, or other electrical-related issues like faulty wires, dead bulbs, and bad electrical connection.
Should both garage door sensors have a green light?
No. Every sensor should have a light but not of the same color. One sensor should have a green light to indicate the sensors are powered on, while the other sensor should have a red light to show that there is no obstruction between the sensors and that the two sensors are seeing each other. The infrared beam is effectively transmitted from one sensor to the other. Thus, if the garage door sensor green light not on, then it is not functional or working.
Conclusion
Your safety when using the garage door openers is paramount. Despite their convenience and appropriateness within garages, the door openers can be hazardous when they malfunction and can cause significant risks to young children, pets, and even your visitors when not in good condition.
Such risks have been eliminated through automation and fitting in the sensors within the garage doors to help reduce the harm by stopping the garage door whenever there is an object or a person on its path. However, wear and tear or malfunctioning are inevitable. Sometimes, the safety sensors may fail to work normally and cause severe injuries to the garage users. The sensors may fail to operate normally and you may ask, “why are my Garage Door Sensors not Lighting Up?” The garage owners must troubleshoot the problems and try finding an appropriate solution to the problem.
Besides, many regulations have been put to ensure the garage doors will smoothly operate after installation to the latest safety standards. A significant problem with a garage door is when it can close even with obstruction in its path. The sensors’ primary function is to stop and reverse the garage door when there is an obstruction on the door’s path. With the manual at your disposal, ensure the sensor’s lighting system is correctly working and emitting the required colors for safety.
