Operating your steel garage door without a regulating (safety) mechanism can inevitably expose you, your family or your pets to the danger of injury or crush by a malfunctioning garage door. As a result, the garage door units are integrated with sensors to oversee your well-being.
While garage door sensors play this indispensable role, the main concern remains whether you understand the different flashing LED lights you see in them and what they mean in your door’s operation. Has it crossed your mind that the garage door sensor yellow light and green light have a critical operational role? You are probably wondering why one light green and one light yellow on your garage door sensor.
What does each of these lights mean?
Stick around to find out this and much more!
Also Read:
- Best garage door openers
- Best screw drive garage door opener
- Best Jackshaft Garage door opener
- Genie Garage door sensor blinking red 3 times
- Garage door sensors not lighting up
What are garage door sensors?
Garage door sensors, also known as photoelectric eye sensors, are safety devices on garage doors that prevent accidents and injuries. They work by detecting any obstruction in the path of the closing garage door and will stop the door from closing if they detect an obstacle in the doorway.
These sensors play an essential role in the safety of garage users. Garage doors can weigh between 400-500 pounds and cause serious injury if they close without warning. You can find the safety sensors on the garage door track, and they communicate with the opener control unit to ensure the door does not close if something is blocking the way.
The sensors are typically positioned on opposite sides of the garage door, with the door between them. These sensors use a laser beam to connect the two eyes when the door is in the open position. When the door is closing, and there’s no obstruction on the laser beam, the door will close smoothly.
However, if something breaks the beam, like a person or an object, the garage door will stop and automatically reverse its direction. This helps protect you and other household members from injuries or accidents. The sensors are essential in ensuring the safety of anyone who may be around the garage door while it’s in operation.
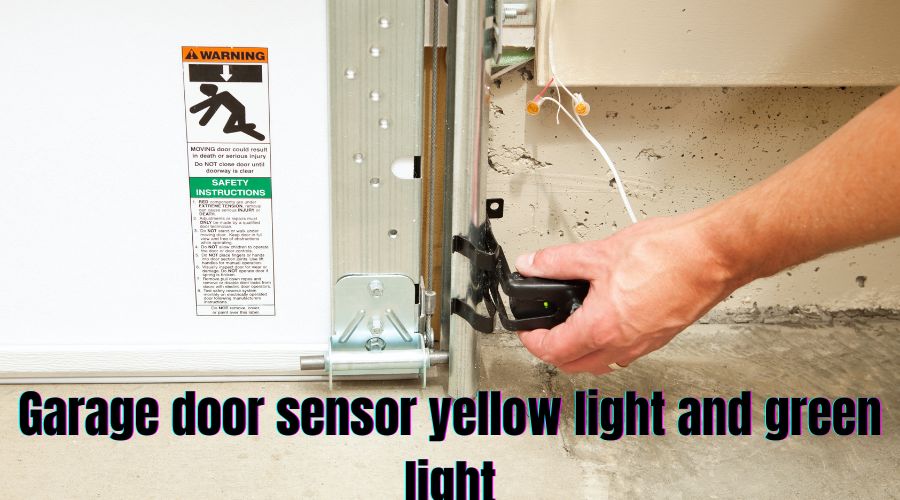
Garage door sensor yellow light and green light
A steady green light indicates that both sensor units are powered up and functional. The green light is visible when nothing obstructs the sensors and the sensors are correctly aligned.
A steady yellow light indicates that the transmitter sensor is operational and sending a ray to the receiver sensor (green). However, when the yellow light is flashing, the safety reverse sensors are out of alignment or obstructed.
The sensors must be fixed by either cleaning the sensors with a soft dry cloth or readjusting the sensor alignment for seamless operation of the garage door.
Note: Garage door sensor lights are fundamental indicators of normalcy or abnormality in garage door operation. Therefore, understanding how to interpret the colors emanated by the sensors is incredibly important.
On that account, the sensors, located about 6 inches above the floor on either side of the garage door, transmit an invisible infrared ray across your garage door entrance to the sensor unit on the opposite side.
There being two sensors, they have a difference in the mode of operation. One sensor shoots/sends the invisible infrared ray (the transmitter) while the other reads the beam (the receiver). Both sensors feature LED light integrated into their design.
Typically, the transmitter has the yellow (amber) light, while the receiver has the green light. Both sensor lights illuminate strongly and steadily when the garage door opener system is normally functioning.’
Therefore, you can agree that these LED lights significantly affect garage door operation. There is nothing to worry about when the sensor lights are glowing steadily. However, if you see them stay off or continuously flicker, something is wrong, and you should interpret this as a call for intervention.
In most instances, the causes for flashing or completely off sensor lights are misalignment, obstruction, or it can be due to dirty lenses. A loose or damaged wiring connection could also cause the sensor light to stay off. Thankfully, you can effortlessly fix this issue by yourself on most occasions.
How to Understand the Code Errors
If you’re unable to locate the source of an error in your garage door opener, you can start by checking the alignment of the safety sensors. It’s important to note that all safety sensors have indicator lights that could help troubleshoot your garage opener.
The sending sensor has a yellow light, while the receiving sensor has a green light. Ensure you verify that the yellow light on the sending sensor is illuminated as well as the green light on the receiving sensor. If the green light is off, you have to realign the sensors. Once the green light is on, the system should function properly.
To clearly understand the color of the sensor lights that indicate the proper functioning of your garage door opener, note that the sending lights should be yellow, and the receiving lights should be green to indicate that the sensors are functional. Otherwise, your garage door opener will malfunction, and you must realign the sensors to fix the problem.
Additionally, refer to the LED troubleshooting light on the motor unit to identify any errors. You can look at the motor codes to determine the problem’s specific cause. A single blink on the motor light indicates that the sensor wires are not connected, two blinks indicate that the sensor wires are shorted, and four blinks indicate sensor wire misalignment.
However, it’s essential to refer to the manufacturer’s instructions for your specific model to troubleshoot any issues. This is because error codes tend to differ depending on your garage door opener model.
What color should the lights be on the garage door sensors
Error codes on garage door openers can vary depending on your specific garage door opener’s model and manufacturer. Some common codes that may indicate issues with the sensors include:
- A single blink on both the sending and receiving sensors can indicate that the wires are broken or not correctly installed.
- A double blink on the sending sensor and a single blink on the receiving sensor may indicate that the wires are reversed or shorted.
- A single blink on the sending sensor and four on the receiving sensor could indicate sensor obstruction or misalignment.
- Four blinks on the sending sensor and six on the receiving sensor may indicate a temporary misalignment or obstruction.
Be sure to consult your garage opener’s user manual or contact the manufacturer for specific troubleshooting instructions due to the variation in garage door opener models.
You must understand these color codes to help diagnose the sensor problems and enhance the safety of your crawling children, pets, and other family members, especially when using the garage for other purposes such as living space, gym, or musical theatre.
How to align safety sensors on a garage door
A malfunctioning garage door can be utterly frustrating to operate. One of the most common causes is misaligned sensors. This is because the sending sensor throws the infrared beam off, so the sensor units cannot ‘see each other,’ causing the door to not close.
There should be no interruption of the beam shot from the sending sensor to the receiving sensor across the entrance of the garage door for normal garage door operation.
How, then, do you rectify this problem? In a stepwise manner, discussed below are tips on how to align safety sensors on a garage door
Step 1: Switch off the power supply to your sensors
It is recommendable always to disconnect the power supply to a unit when dealing with electricity. Identify the breaker box in your home and trip the fuse connecting your garage.
Step 2: Identify the sensors and loosen the screws
Usually, the garage door sensors are located on either side of your garage door from two to six inches off the floor. Unfasten the nuts that mount the sensors so that they are loose rather than unscrewing them out. This way, you can intentionally move the mounting brackets up or down to the needed heights.
Step 3: Realign the sensor units
You can adopt either of the two easy fixes to realign the sensors. With the screws still loose, slide both sensors downwards as low as possible. The first fix involves using a long string.
Tie the string to one of the sensors, run it across the garage entrance, and tie it to the sensor on the other side. Position a level in a way that the bottom runs along the string.
Keep adjusting one or both sensors by moving the bracket upwards until you ensure that the string line is level. This way, you will get both sensors to a level position.
Alternately, you can use a laser level to realign the sensor units. However, instead of loosening both sensor brackets, you will first position the level aligned with one sensor. Manipulate the sensor on the opposite side till the laser’s beam hits that sensor, after which both sensors will be level.
Step 4: Secure the sensor units and confirm the level
To secure the sensors in the new level position, re-fasten the screws you had loosened earlier. If you used the string fix, verify that the string is level and remove it. Re-connect the power supply to your garage door and enjoy your excellent work.
You can check if the sensors are correctly aligned by having a card box in the garage’s doorway and try closing it. If it stops, then the seniors are correctly aligned and functioning. If the door crashes the object, the sensors are still misaligned, and you must re-align them in the same process.
Ensure you do not apply too much force when fastening the screws not to interfere with the alignment.
The video below describes some of the garage door sensor problems.
Why does my garage door not close and light flashes?
Your garage door may fail to close, and light flashes due to wiring problems or obstruction on its path. The operation of your garage door depends on the safety sensors that ensure it reverses its direction when there is an interruption on its track. However, if the sensors are not properly connected, the LED lights may blink continuously, and the door will refuse to close.
Note. You can also solve the issue by checking the installation of the sensors. First, you need to confirm if the sensors were installed correctly. Then check the opener’s lights. If you notice that they blink two times, the lock button is on.
To resolve this, you must disengage the door control’s lock button. Operating your door via remote controls is impossible when the lock feature is engaged. You can only manipulate the door using the door control.
Here’s how to turn the lock button off. On the door control, press the lock button, after which the sensor light blinks twice, indicating that the lock feature has been disengaged. Now try operating the door with remote controls and see if the door will shut.
Subsequently, if you notice that the lights flash ten times upon examination, this suggests an obstruction or misalignment problem with the sensors. The infrared beam is thrown off, meaning that the units do not ‘see each other in the case of misalignment.
As discussed earlier, you can quickly rectify the misalignment problem using the string or laser fix. Obstruction can be due to sunlight, objects in the garage door path or dirt debris coating the photo-eye of the sensors. Get rid of the offending object or agent to restore the regular operation of your garage door
What color should the lights be on garage door sensors
Usually, one sensor emanates a green light signaling that the connection of sensor units to power is excellent and that the sensors can communicate. If the green light goes off, flashes, or appears dim, there is an issue with sensor alignment.
The other sensor emanates a yellow or red light and is usually the unit that sends the beam, also referred to as the sending sensor. You will observe it when there is no obstruction between the two sensor units and proper alignment.
At times, you might find an orange light which means damaged or loose wiring connection (If the orange light remains off or flickers).
In most garage door malfunctioning cases, the safety sensors tend to be the most probable genesis of the problem. Therefore, a common question when trying to diagnose the problem or establish the functionality of your garage door is, what color should the lights be on garage door sensors?
These LED lights serve as indicators of normalcy or a malfunction in the garage door opener system. That is why they come in different colors, which have different meanings.
An ideal garage door opener system should have the sending sensor showing a steady glow of yellow (amber) or red light and the receiving sensor showing a steady green light. This means that the LED lights on both sensors should not light up green unless you’re using an old sensor system. Also, the garage door opener won’t work if both lights stay off.
Why is my Chamberlain garage door sensor light yellow
The yellow light on the Chamberlain garage door indicates that the sending sensor (transmitter) is operating. However, if it flashes, there is an obstruction on its path, or the sensors are misaligned.
You might notice other colors for top garage door openers from the exclusive Chamberlain brand. For instance, for openers featuring a battery backup feature, the LED light near the top of the learn button will display several colors to signal different messages
How to fix a yellow light on A Garage Sensor?
You have by now established that LED lights are vital components of a garage door opener system. If you take note of a deviation from the normal steady illumination of LED lights, there is probably something wrong.
Particularly, when the yellow light is not solid or is totally off, chances are your garage door is already malfunctioning. This can get really annoying, but fret not! Here, we look at how to fix a yellow light on a garage sensor in detail, as elaborated further.
Problems with the sensor yellow light indicate a few sensor issues, including malfunctioning, misalignment, obstruction, coating of photo-eye, or worn-out sensors. Begin with cleaning the sensor lens with a wet paper towel to get rid of the dirt that accumulates on the lenses over time if you observe a yellow light on your sensor.
Misalignment of the sensor units is yet another highly probable cause for the yellow light issue. You ought to accurately realign the sensors so that they point each other at the same exact angle.
You will want to examine the wiring leading to the sensor if cleaning the lenses and realigning the units did not do the trick. Examine for damage, corrosion, fraying, or worn-out wires that could be causing a shorting of the opener system. You might want to seek help from garage door experts since you are dealing with electrical connections.
You can also suspect that the sensor units are malfunctioning if you notice that your garage door does not close besides showing yellow light problems. Also, instances like a garage door that quickly reverses upon closing suggest that the sensors malfunction.
What does yellow light mean on a garage door sensor?
The yellow light should glow steadily when the transmitter is in use. An issue with the transmitter or infrared transmission manifests through the yellow light, which starts flashing or goes off totally. When the yellow LED light is flashing, the sensors are misaligned or are obstructed from sending the beams to the receiver sensor.
Your garage door system is integrated with two sensors, the transmitter that sends the beam and the receiver to read the beam. You will only see a steady yellow light when there is no obstruction on the door’s path. However, when there is an obstruction, the door will stop if it is opening or closing.
The transmitter sensor produces a yellow light, and the receiving sensor has a green light. A solid illumination of the yellow light shows that the garage door is correctly working and the sensors are seeing each other. However, if the yellow light is flashing, the primary culprit is the sensors being out of alignment.
When the sensors are misaligned, the door will not function. As such, you need to find solutions and fix the problem. However, do not fret. The process is pretty simple. You will not even need a professional to help you fix it. All you need is a tape measure and a screwdriver or wrench.
The first step to aligning the sensors is using a tape measure to determine the position of the sensor from the ground. Measure the distance and establish whether it is at least 6 inches above the garage door. Note that height. Say, 6.5 inches.
Once you have determined the height of one sensor from the ground, measure that of the second sensor. If there is a height difference, adjust the second sensor to match that of the first one.
You can adjust the height by loosening the screws holding the sensors in the brackets using the wrench or screwdriver and setting it to the exact value of the first one (6.5 inches). Use the tape measure to determine this height.
Once the sensors are of the same height, tighten the screws and ensure you do not interfere with the height. Once the sensors are in line, you will see a steady glow of the yellow light from the emitter sensor. The door will also close smoothly and stops when there is an obstruction underneath.
How to replace old garage sensors?
When your garage door sensors fail, the primary culprit could be the wear and tear due to old age or continuous exposure to sunlight. The practice requires purchasing new safety sensors and replacing them with worn-out ones. The process is simple, and you may not need an expert as long as you rightfully follow the manual.
Once you have purchased the new sensors, follow the below steps to change your sensors
Step 1: unplug your garage door opener from the power source. This will help prevent any electrical shock when handling the sensor wiring.
Step 2: Loosen the wiring nuts on both sensors. Use a wrench in this process.
Step 3: Disconnect the sensors and remove them once you have loosened the wing nuts.
Step 4: Use a tape measure to determine the heights of the new sensors as you attach them to positions. Ensure they are of the same height, about 6 inches, and at an angle. The approach will enable the sensors to see each other and communicate by sending infrared beams from the transmitter (yellow sensor) to the receiver (green sensor).
Step 5: Use the wrench to tighten the wing nuts on both sensors. Once you have determined the sensors are at the same heights, this should be done.
Step 6: Plug in your garage door and try the sensors. The sensors will produce steady green light (receiver sensor) and yellow light (transmitter sensor) to show they are functional and aligned.
Frequently Asked Questions (FAQs)
Q1. What does an orange light on a garage door sensor mean?
If your garage door sensor blinks orange, it implies loose wire connections.
Examine the electrical connection to the sensor while paying particular attention to the wire running to the terminal behind the opener. You might find a nail or staple penetrating through the cable insulation. In some instances, it could be broken wires or chewed by the rodents in your garage. In case of broken or damaged wires, replace them.
Q2. Garage Door Sensor Yellow
When the LED in your garage door sensor yellow, your safety reverse sensors are misaligned. You need to fix the sensors before your garage can close. When the sensors are out of alignment, they cannot see each other. Hence, signals cannot be sent from the transmitter to the receiver sensor.
To fix the problem, adjust each sensor until they are perfectly aligned. Besides, you may consider cleaning the sensor lenses with a clean, soft cloth as the dirt that accumulates on the lens surface may also prevent the sensors from seeing each other.
Q3. How do you know if your garage door sensors are bad?
While it is somewhat unclear to determine if your sensors are bad, several signs suggest there could be a malfunction. Signs such as blinking sensor lights, sensor lights that remain off, or a garage door that won’t shut down can help you narrow down troubleshooting to the sensor level.
Q5. How long do garage door sensors last?
Several factors come into play to influence the longevity of garage door sensors. However, sensors with the battery backup feature utilize batteries that have a lifespan of between 3-5 years on average. Battery replacement is necessary when the batteries bite the dust.
Q6. Will a garage door work without sensors?
Yes, a garage door can work without sensors. Such instances will require you to bypass the sensors, prompting you to operate the garage door manually. Bypassing the sensors will require you to disengage automatic garage door operation. The garage door opener will not operate the garage door if it lacks functional sensors.
Q7. One Garage Door Sensor Light is Yellow, and the Other is Green
The green color in a garage door sensor shows that the sensor units are powered on and are functional or working. The green light also means there is no form of obstruction in the sensor’s path or doorway and that the sensors are perfectly aligned.
On the other hand, the garage door sensor yellow light shows that the transmitter sensor effectively sends the infrared rays to the receiver.
Q8. What color should Craftsman garage door sensor lights be?
Both Craftsman garage door sensors should display steady light. However, the color dispensed by each LED sensor is different. The receiver sensor shows a green color while the transmitter sensor is orange.
For the Craftsman garage door sensor, the green light on the receiver sensor will begin to blink if the sensors are out of alignment.
Q9. How do you fix a yellow light on a garage sensor?
The yellow light in your garage door shows that the transmitter sensor is sending rays. However, in some cases, you will observe that the sensor does not produce a steady yellow light. The problem may occur when there are obstructions in the doorway, or the sensors are out of alignment, preventing the communication between the transmitter and receiver sensors.
To fix this, look for obstructions to the sensors that may include an object, pets, or crawling children in the doorway. There could also be spiderwebs or dirt in the lens of the sensors. Wipe the sensor with a damp cloth to remove the dust or dirt. Also, remove any obstruction and watch your sensor produce a steady yellow light.
Q10. Garage Door Sensor Light is Orange
The orange color in your garage door sensor indicates that there is a problem with the electrical connection. You need to follow the connection to the sending sensor and all the way to your opener’s terminal. Check whether there is a disconnection or a nail cutting through the wire insulation and fix it.
The LiftMaster sensor orange light problem can be fixed in the same manner.
Q11. Do you need garage door sensors installed?
Household members, including kids and pets, can incur serious injuries or accidents without garage door sensors, making them necessary. Additionally, garage door safety mechanisms, especially safety sensors, are requisite by the United States’ garage safety regulations, which makes installing the sensors inevitable.
Final Verdict
While garage door sensor lights appear small and negligible to some individuals, they are unbelievably important. These lights are ingenious additions that light up contrasting colors to mean different messages or contexts.
This article aims to acquaint you with helpful information to help you decode the various garage door sensor lights. The take-home message is that if you see the sensor lights flicker or stay off, you should interpret that as a looming or already established problem.
Therefore, sensor lights count as one of the central indicators of a problem with your garage door opener system. Thankfully, this article provides you will all the valuable hacks and tips to fix issues and interpret situations. I hope you have yourself an excellent read.
you are really a good webmaster. The site loading velocity
is incredible. It seems that you are doing
any unique trick. Moreover, The contents are masterpiece.
you have done a fantastic job on this matter!
Thank you
I?ve recently started a web site, the info you offer on this website has helped me tremendously. Thank you for all of your time & work.
You most welcome.
Did you write the article yourself or you hired someone to do it?
I was wondering because I am a site owner too and struggle with writing
new content all the time. Someone told me to use AI to do create
articles which I am kinda considering because the output is almost written by human. Here is the sample content they sent me –
https://sites.google.com/view/best-ai-content-writing-tools/home
Let me know if you think I should go ahead and use AI.
Hello. I did write the article myself ….you can contact me. I can help you with the creation of contents instead of using AI. I also know some good content creators. The generation of articles through AI may not help you in the long run, especially with google updates. Thank you.
This design is steller! You certainly know how to keep a reader entertained.
Between your wit and your videos, I was almost moved to start my own blog (well,
almost…HaHa!) Great job. I really loved what you had to say, and more than that, how you presented it.
Too cool!
Thank you. Glad you liked it.
Wonderful blog! I found it while browsing on Yahoo News. Do
you have any tips on how to get listed in Yahoo News?
I’ve been trying for a while but I never seem to get there!
Thanks
However long the night the dawn will break.
I savor, cause I found exactly what I was having a look for. You have ended my four day lengthy hunt! God Bless you man. Have a great day. Bye
I’m glad you got helped. You welcome. Stay blessed as well.
We’re a group of volunteers and starting a new scheme in our community. Your site offered us with valuable info to work on. You’ve done an impressive job and our whole community will be grateful to you.
Thank you
I simply could not go away your web site before suggesting that I actually loved the usual information an individual supply for your visitors? Is gonna be again frequently in order to inspect new posts
Thank you
A formidable share, I simply given this onto a colleague who was doing a little evaluation on this. And he actually bought me breakfast as a result of I found it for him.. smile. So let me reword that: Thnx for the treat! But yeah Thnkx for spending the time to discuss this, I feel strongly about it and love reading extra on this topic. If potential, as you become experience, would you mind updating your blog with extra particulars? It’s highly helpful for me. Huge thumb up for this weblog publish!
Thank you so much
Its like you read my mind! You seem to know so much about this, like you wrote the book in it or something. I think that you could do with a few pics to drive the message home a little bit, but instead of that, this is magnificent blog. A great read. I’ll certainly be back.
Thank you. Always welcome and looking forward to more of such insights.
плитка тротуарная https://тротуарная-плитка3.рф/.
Definitely believe that which you said. Your favorite reason seemed to be on the internet the easiest thing to be aware of. I say to you, I definitely get irked while people consider worries that they just don’t know about. You managed to hit the nail upon the top and also defined out the whole thing without having side-effects , people can take a signal. Will likely be back to get more. Thanks
Thanks
I believe this is among the most vital information for me. And i’m satisfied reading your article. However wanna observation on some general issues, The site taste is perfect, the articles is in point of fact nice : D. Just right job, cheers
Thank you
great post, very informative. I ponder why the opposite experts of this sector don’t realize this. You should continue your writing. I am confident, you have a great readers’ base already!
Thank you. You can share on your socials as well.
You actually make it seem really easy together with your presentation but I find this matter to be really one thing which I feel I would by no means understand. It seems too complex and very wide for me. Ev Dışı Tüketim. I am looking forward to your next submit, I will attempt to get the grasp of it. I am often to blogging and i really appreciate your content. The article has really peaks my interest. SMM Panel. I am going to bookmark your site and keep checking for new information.
It?s onerous to seek out educated people on this topic, but you sound like you realize what you?re speaking about! Thanks
I don?t even know the way I stopped up here, but I believed this put up used to be great. I don’t recognise who you are but definitely you’re going to a well-known blogger should you aren’t already 😉 Cheers!
Thank you for another excellent article. Where else could anyone get that type of information in such a perfect way of writing? I’ve a presentation next week, and I am on the look for such information.